Table of Contents
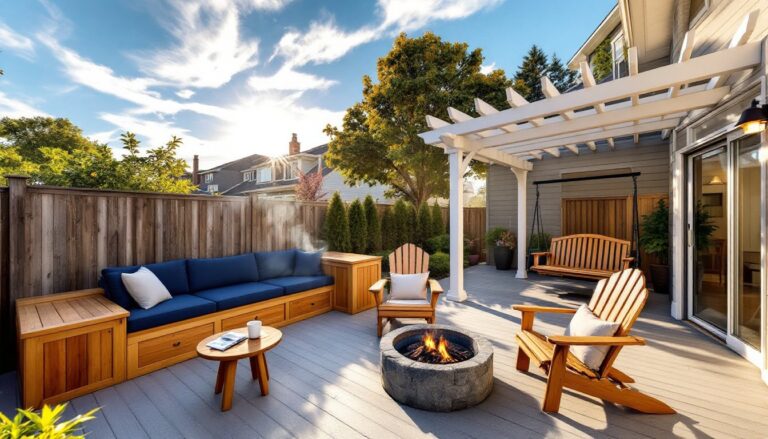
ToggleConcrete patios with integrated steps offer one of the most durable, cost-effective ways to expand usable outdoor space. Unlike wood decking that warps or pavers that shift, a properly installed concrete slab with formed steps delivers decades of low-maintenance service. Modern finishing techniques, stamping, staining, polishing, mean homeowners no longer have to settle for the dull gray slabs of the past. Whether transitioning from a back door to ground level or creating multi-tiered entertainment zones, the right concrete design can match almost any architectural style and budget.
Key Takeaways
- Concrete patios with steps cost $6–12 per square foot and last decades with minimal maintenance, making them significantly more affordable and durable than natural stone or wood alternatives.
- Modern finishing techniques including stamped concrete, staining, polishing, and board-formed designs allow homeowners to customize concrete patios to match any architectural style and aesthetic preference.
- Proper subgrade preparation with compacted gravel, precise form layout meeting IRC standards (7¾-inch max riser height, 10-inch min tread depth), and reinforcement placement are critical to preventing settling and cracking.
- Popular concrete patio design trends include floating cantilevered steps, tiered multi-level layouts, curved steps that guide traffic, and wide shallow landings that double as seating areas.
- A seven-day moisture-curing period and avoiding foot traffic for 24–48 hours after pouring are essential for achieving a hard, crack-resistant final surface on your concrete project.
- Before breaking ground, locate utilities using 811, verify permit requirements (typically needed for patios over 200 square feet), and confirm local setback requirements of 3–5 feet from property lines.
Why Choose Concrete for Your Patio and Steps
Concrete remains the workhorse of outdoor hardscaping. A 4-inch slab over compacted gravel base costs roughly $6–12 per square foot installed, depending on region and finish, often half the price of comparable natural stone or high-end pavers. It handles freeze-thaw cycles better than most materials when air-entrained mix is used and the subgrade is properly prepared.
From a structural standpoint, monolithic pours, where steps and patio are cast together, eliminate seams that collect water and create trip hazards. The ICC International Residential Code (IRC) specifies maximum step riser heights of 7¾ inches and minimum tread depths of 10 inches for safety: concrete forms lock in these dimensions permanently, unlike modular units that can settle unevenly.
Maintenance is minimal: an annual pressure wash and resealing every two to three years keeps the surface weather-resistant. Compare that to wood stairs requiring stain and fastener checks every season. Concrete’s thermal mass also moderates temperature swings, keeping bare feet comfortable on summer mornings.
Modern Minimalist Concrete Step Designs
Floating tread steps rank among the most requested contemporary designs. These cantilevered treads, often 6–8 inches thick, project from a hidden steel or reinforced concrete stringer. The visual effect is clean and light, ideal for mid-century or industrial-style homes. Fabrication requires precision formwork and #4 rebar (½-inch diameter) on 12-inch centers to prevent cracking under foot traffic.
Another streamlined option: wide, shallow landings that double as seating. Instead of standard 11-inch treads, extend each step to 18–24 inches deep. This invites casual perching and softens the transition between levels. Pair with a broom finish for slip resistance without busy patterns, just drag a stiff-bristled broom across fresh concrete perpendicular to traffic flow.
For ultra-modern aesthetics, consider board-formed concrete. Lining forms with rough-sawn cedar or pine leaves horizontal wood-grain imprints in the cured surface. The texture adds depth while maintaining the monolithic look. Sand lightly after stripping forms to remove splinters, then seal with a penetrating silane/siloxane product to prevent moisture ingress.
Stamped and Textured Concrete Step Ideas
Stamped concrete mimics the look of flagstone, slate, or brick at a fraction of the cost. Contractors press rigid polyurethane mats into freshly floated concrete, then apply release agents and integral color to create realistic joint lines and color variation. Popular patterns for steps include ashlar slate and running bond brick, both of which disguise minor surface imperfections and provide traction.
Timing is critical: stamping happens during a narrow window when concrete is firm enough to hold an impression but soft enough to accept the mat, usually 2–4 hours after pour, depending on weather. Homeowners attempting DIY stamping should rent mats and practice on a small test slab first: misaligned patterns are permanent.
For rustic or cottage-style homes, a rock-salt finish offers an affordable alternative. Scatter coarse rock salt onto wet concrete, tamp lightly, then wash it away after curing. The result is a subtle pitted texture that mimics weathered stone. This technique works especially well on steps connecting to natural landscape inspiration elements like gravel paths or native plantings.
Exposed aggregate remains a classic choice: after initial set, contractors spray the surface with a retarder, then pressure-wash to reveal embedded pebbles. Choose aggregates that complement your home’s exterior, 河石 river rock for earth tones, white quartz for brighter schemes. Be aware that exposed aggregate requires more frequent sealing to prevent freeze damage in cold climates.
Multi-Level Patio Designs with Integrated Steps
Tiered patios solve sloped yards while creating distinct zones for dining, lounging, and cooking. A typical two-level design might place a 12×16-foot upper pad near the house for a dining set, then drop 14–18 inches to a larger lower pad with a fire pit. The connecting steps become a natural focal point and design opportunity.
When planning elevations, consider sightlines and drainage. Each level should slope ¼ inch per foot away from the house to prevent water pooling. Install a perimeter drain tile (4-inch perforated PVC) in a gravel bed along uphill edges to intercept runoff before it undermines the slab.
For properties with significant grade changes, a regional home style approach may incorporate wider landings every four to six risers. These mid-run platforms provide resting points and meet accessibility guidelines if you’re future-proofing for aging in place. Each landing should be at least 3 feet deep to accommodate a full stride.
Curved steps soften geometric patio layouts and guide traffic naturally. Forming curves requires flexible materials like ¼-inch hardboard or laminated plywood staked every 12–18 inches. The extra labor typically adds $3–5 per linear foot, but the sculptural effect integrates hardscaping with planting beds more gracefully than straight runs.
Adding Style with Color, Stain, and Finish Options
Integral color, pigment mixed throughout the concrete, offers the most uniform, fade-resistant results. Manufacturers like Davis Colors and Solomon Colors provide dozens of earth tones: terracotta and sandstone shades hide dirt better than stark whites or charcoals. Expect to add $0.75–1.50 per square foot for integral color, and order 10–15% extra for future repairs so batches match.
Acid stains create variegated, translucent tones by reacting chemically with lime in cured concrete. The unpredictable mottling suits Mediterranean or Spanish Colonial homes but requires careful surface prep, any oil, curing compound, or sealer residue will block penetration. Apply in multiple thin coats with a pump sprayer, then neutralize with baking soda solution and rinse thoroughly. Colors range from amber and terracotta to blue-green and charcoal.
For bold, opaque hues, water-based concrete stains act more like paint. They don’t react chemically, so coverage is consistent and color choice is nearly unlimited. The trade-off: they sit on the surface rather than penetrating, so high-traffic step edges may show wear within 3–5 years. Touch-ups are straightforward, though, just clean and reapply.
Polished concrete works best on large, flat patio surfaces rather than steps. Contractors grind the surface with progressively finer diamond pads (from 30-grit metal bond to 3000-grit resin), then apply a lithium silicate densifier. The mirror-like finish is stunning but dangerously slippery when wet. Reserve polishing for covered patios or apply an anti-slip additive to sealer.
Planning Your Concrete Patio and Steps Project
Start with a site survey. Locate underground utilities using your local 811 service at least two business days before excavation. Mark property lines and setback requirements, many jurisdictions require patios to sit at least 3–5 feet from side and rear property lines. Check if your municipality requires a permit: most do for patios over 200 square feet or any structure with steps exceeding 30 inches in total rise.
Subgrade preparation determines long-term performance. Excavate to a depth that accommodates 4 inches of compacted gravel base plus your slab thickness (typically 4 inches for patios, 6 inches for steps and heavy-use areas). Rent a plate compactor, the kind that weighs 150–200 pounds, and make multiple passes until the base no longer shows footprints. Skipping this step invites settling and cracking.
Form layout requires precision. Use 2×6 or 2×8 lumber staked every 3–4 feet: for curves, wet the boards and pre-bend them a day before installation. Level risers within ⅛ inch over their run, a 4-foot level and shims work for most DIYers. Double-check tread depth and riser height against IRC standards: inspectors will measure these if you’re pulling a permit.
Reinforcement depends on soil and load. Welded wire mesh (6×6-inch, 10-gauge) is common for standard patios, positioned at mid-thickness during pour. For steps or patios in expansive clay soils, upgrade to rebar: #4 bars in a 12×12-inch grid, tied at intersections with wire. Proper placement matters, rebar resting on the subgrade does nothing. Use 2-inch chair supports to hold steel at mid-slab height.
Concrete mix should be 3,000–3,500 psi for exterior flatwork, with air entrainment (5–7%) if you experience freeze-thaw cycles. A typical 12×12-foot patio at 4 inches thick requires about 1.78 cubic yards: order in ½-yard increments and have extra hands ready, concrete doesn’t wait. For small projects under 2 yards, bagged mix is feasible but exhausting: one 80-pound bag yields 0.6 cubic feet, so budget around 120 bags for that same 12×12 slab.
Curing is non-negotiable. Keep new concrete moist for at least seven days using wet burlap, plastic sheeting, or a spray-on curing compound. Hydration continues for weeks: the longer you maintain moisture, the harder and more crack-resistant the final surface. Avoid foot traffic for 24–48 hours and keep heavy furniture off for at least a week.
Conclusion
A well-designed concrete patio with integrated steps blends function, safety, and curb appeal into one permanent structure. The range of finishes, from polished minimalism to stamped Old-World texture, means concrete adapts to nearly any home style without the maintenance burden of organic materials. Invest time in prep work, respect structural and code requirements, and the result will serve your household for decades.