Table of Contents
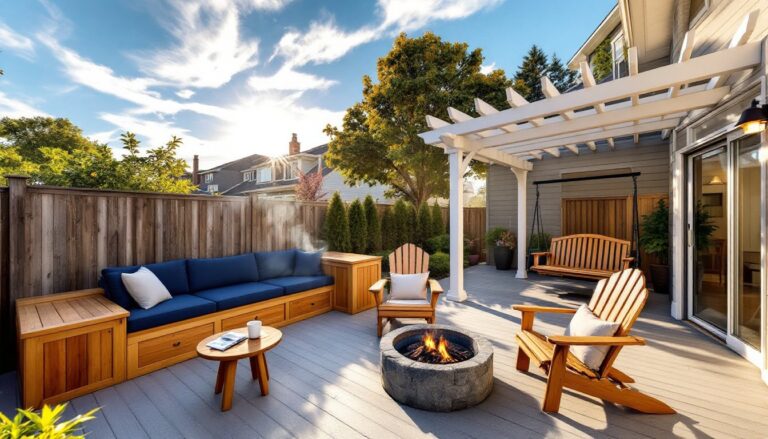
ToggleAdding a bar top to your deck railing does more than create a surface, it turns your deck into a functional gathering spot without sacrificing square footage. This approach works especially well on smaller decks where bulky furniture crowds movement, or along perimeter sections where the view’s worth keeping clear. Whether you’re planning a built-in counter for morning coffee or a full outdoor bar for entertaining, the right railing bar top can maximize usable space while adding character to the deck’s design.
Key Takeaways
- A deck railing bar top maximizes outdoor entertaining space without taking up floor area, making it ideal for small decks and views worth protecting.
- Cedar and redwood are popular wood choices ($8–$18 per linear foot), while composite and PVC alternatives ($4–$10 per linear foot) offer low-maintenance durability for railing bar top installations.
- Proper deck railing bar top design requires 1–2 inch overhangs, sturdy fastening every 16 inches, and sloped drainage to prevent moisture absorption and structural damage.
- Integrated features like tiered shelves, LED lighting, and drink rails transform your railing bar top into a multi-functional entertaining hub that extends deck usability.
- Most bar top projects don’t require permits on existing code-compliant railings, but verify local building codes and ensure posts are spaced no more than 6 feet apart before installation.
- Consistent finishing with exterior stains or paints applied within 48 hours of installation protects wood investments and maintains a cohesive deck design for years of use.
Why Add a Bar Top to Your Deck Railing?
A bar top mounted to deck railing serves multiple purposes beyond aesthetics. It provides a stable surface for drinks, plates, and grilling tools without requiring floor space for a separate table. For decks with elevated views, it creates an ideal spot to lean and take in the scenery without blocking sightlines for seated guests.
From a structural standpoint, most railing systems, whether wood, vinyl, or metal, can support a properly installed bar top without modifications, provided the posts and top rail are already code-compliant. Standard deck railing height sits at 36 inches from the deck floor (though some jurisdictions require 42 inches for elevated decks), which translates to a comfortable standing height for most adults.
Bar tops also increase property appeal. Outdoor entertaining features rank high with buyers, and a well-executed railing bar blends seamlessly with the deck’s existing design. It’s a relatively low-cost upgrade compared to adding a full outdoor kitchen or pavilion, especially if the railing framework is already in place.
Popular Materials for Deck Railing Bar Tops
Wood Bar Top Railing Options
Cedar, redwood, and pressure-treated pine remain the most common choices for wood bar tops. Cedar naturally resists rot and insects, requires minimal treatment, and weathers to a silver-gray patina unless sealed annually. Expect to pay $8–$12 per linear foot for 2×6 or 2×8 clear cedar planks. Redwood offers similar durability with a richer color but runs $12–$18 per linear foot in most regions.
Pressure-treated southern yellow pine costs less, around $3–$5 per linear foot, but needs regular staining or sealing to prevent warping and splintering. For bar tops, choose boards stamped ground contact-rated (.40 or higher retention) even if they won’t touch soil: the extra preservative helps with moisture exposure from drink spills and weather.
Hardwoods like ipe or mahogany deliver exceptional longevity and a premium look, but they’re overkill for most DIY budgets at $15–$30 per linear foot. They’re also dense enough to dull standard saw blades quickly, plan on carbide-tipped blades and pre-drilling all fastener holes.
Whatever species chosen, use boards with actual dimensions that match the railing width. A nominal 2×6 measures 1.5 x 5.5 inches actual: a 2×8 is 1.5 x 7.25 inches. If the top rail is 3.5 inches wide (a nominal 4×4 post cap), a 2×8 will overhang about 2 inches on each side, enough room for a glass but not so much that it feels precarious.
Composite and Low-Maintenance Alternatives
Composite decking repurposed as bar top material eliminates the maintenance cycle of wood. Brands like Trex, TimberTech, and Fiberon offer grooved or solid-edge boards in widths from 5.5 to 7.25 inches. These materials resist fading, won’t splinter, and handle spilled drinks without staining. Cost runs $4–$8 per linear foot depending on the product line.
One caveat: composite expands and contracts with temperature swings more than wood. Leave 1/8-inch gaps between board ends and use hidden fasteners or stainless screws driven into pre-drilled holes to prevent cracking. Some composites also get slippery when wet, so choose a textured finish rather than a glossy cap.
PVC trim boards (like Azek or KOMA) work well for painted bar tops. They’re fully waterproof, won’t rot, and hold paint better than wood. At 3/4-inch or 1-inch thickness, they’re lighter than composite but still rigid enough for spans up to 4 feet between supports. Expect to pay $6–$10 per linear foot.
For a modern look, aluminum bar top kits designed for railing systems provide a no-fuss option. These typically feature powder-coated extrusions that lock into compatible railing posts. They’re durable and won’t warp, but they lack the warmth of wood or composite and can feel hot to the touch in direct sun.
Creative Design Ideas for Railing Bar Tops
L-shaped or wraparound configurations make the most of corner posts. Extend the bar top along two adjacent railing runs and miter the corner joint at 45 degrees for a clean transition. This setup works especially well for decks with corner views or grilling zones where the cook needs countertop access from multiple angles.
Tiered bar tops add dimension when the railing has a wide top rail or bulky post caps. Install a narrower shelf (like a 1×6) just below the main bar surface to hold condiments, napkins, or potted herbs. Secure it with L-brackets every 24 inches, and finish edges with a routed roundover to avoid snags.
For a rustic aesthetic, leave live-edge slabs natural and seal them with marine-grade polyurethane. Local sawmills often sell kiln-dried slabs in lengths up to 8 feet. These require sturdy blocking or corbels underneath since they’re heavier than dimensional lumber, plan on supports every 30 inches.
Integrated lighting transforms the bar top into an evening focal point. LED strip lights mounted under the bar top overhang or within routed channels provide ambient lighting without glare. Low-voltage systems (12V) are safer for outdoor use and easier to install than line-voltage fixtures. Many outdoor living design ideas incorporate subtle lighting to extend usable hours on porches and decks.
Drink rails or built-in coolers elevate functionality. Rout a shallow channel (about 1 inch wide, 1/2 inch deep) along the bar top’s inner edge to catch condensation or spills. For coolers, cut an opening sized to fit a drop-in stainless steel trough or a repurposed sink basin. Line the cutout with silicone sealant to keep water out of the railing structure.
Color choices matter. Stained finishes highlight wood grain, but they require reapplication every 1–3 years depending on sun exposure. Solid-color deck stains or exterior paints offer better UV protection and last 4–6 years between coats. If painting, prime all surfaces first, even pressure-treated wood, to prevent tannin bleed and improve adhesion.
Installation Tips and Considerations
Before installing, verify that the existing railing meets local code. IRC (International Residential Code) requires railing posts spaced no more than 6 feet apart and top rails capable of withstanding a 200-pound concentrated load applied in any direction. If the railing feels wobbly, adding a bar top won’t fix it, you’ll need to reinforce or replace posts first.
Measure the railing’s top rail width and decide on overhang. A 1-to-2-inch overhang on each side provides enough surface area without looking bulky. For railings with 2×4 top rails (actual 1.5 x 3.5 inches), a 2×6 or 2×8 bar top works well. Mark cutting lines with a chalk line to keep edges straight, especially on long runs.
Fastening methods vary by material. For wood, use stainless steel or coated deck screws (minimum #8 x 2.5 inches) driven from the top down into the rail, countersunk slightly and filled with exterior wood filler or plugs. Space screws every 16 inches and avoid fastening within 2 inches of board ends to prevent splitting.
For composite or PVC, use the manufacturer’s recommended hidden fasteners or color-matched screws. Pre-drill all holes, composites crack easily if screws are overdriven. Some systems use aluminum tracks that clip onto the railing and accept grooved boards without visible fasteners.
If the railing has decorative metal balusters or cable infill, the bar top typically mounts directly to the posts and top rail. Use L-brackets or angle braces on the underside for added support, especially on spans longer than 4 feet. For wood posts, predrill bracket holes: for vinyl or composite posts, use backing blocks or toggle bolts rated for outdoor use.
Finishing protects the investment. Sand all edges smooth (120-grit minimum) and apply a water-repellent sealer or exterior stain within 48 hours of installation to prevent moisture absorption. For projects involving multiple woodworking plans and techniques, consistent finishing across all elements keeps the look cohesive.
Safety note: Wear safety glasses when cutting, hearing protection if using power saws, and a dust mask when sanding or cutting pressure-treated lumber. Treated wood contains copper-based preservatives, wash hands before eating and avoid burning scraps.
Permits usually aren’t required for adding a bar top to existing code-compliant railing, but if you’re rebuilding the railing or altering the deck’s footprint, check with your local building department. Some jurisdictions classify railing modifications as structural work that triggers inspection requirements.
Consider drainage. Even sealed wood will absorb some moisture. Slope the bar top slightly (about 1/8 inch per foot) away from the house to shed rainwater, or install it level and rely on finish coatings. For serious drainage, drill a few 1/2-inch weep holes along the front edge, spaced every 24 inches.
Tool-wise, a circular saw with a guide works for straight cuts, but a miter saw delivers cleaner angles for corners and ends. A router with a roundover bit softens edges and prevents splinters. If working with hardwood or thick composite, a jigsaw handles curved cutouts for posts or built-in features. Many detailed workshop tutorials and tool guides break down tool selection for various materials and skill levels.
Conclusion
A railing bar top blends form and function, turning underused railing space into a practical surface for outdoor entertaining. With the right materials, solid installation, and regular maintenance, it’ll handle years of use while complementing the deck’s design. Plan carefully, measure twice, and don’t skip the finish work, those details separate a clean DIY project from one that looks tacked on.